Today i had to replace the laser for my lite-on DVD drive and decided to document it to help out anyone who might be trying to accomplish something similar.
First off, sorry if this is old news, but I had trouble finding any tutorials for lite-on laser replacement.
All the tools I needed for this were a precision screwdriver set ($1 from a dollar store) and a torx 6 screwdriver (~5$ i think, from Home Depot)
This is what your drive should look like. You need to disconnect if from the xbox and remove the metal casings (they just slide off). If you have done all this and it still looks different, you probably have a different brand of drive and may want to find a different tutorial.
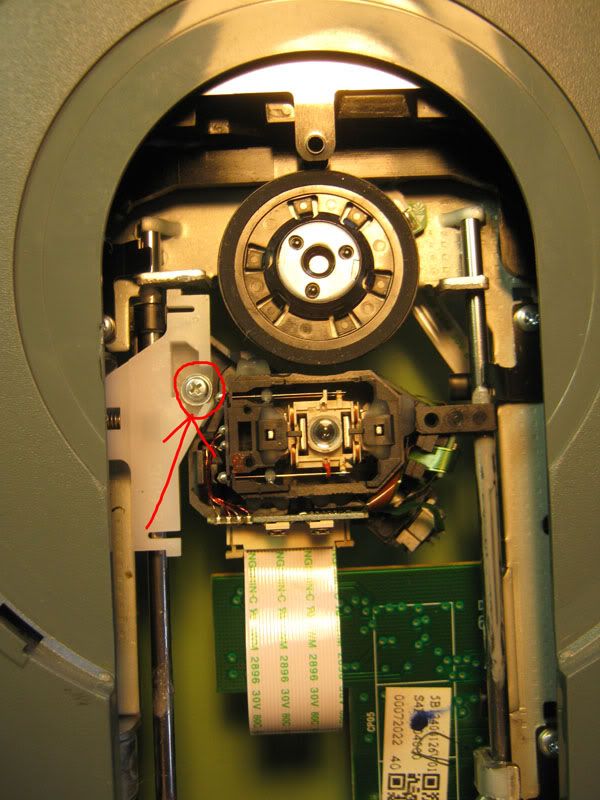
The first thing we want to do is remove the screw circled in red.
heres a close up:
Once this screw is out, you should be able to lift the white piece and pull it out. This piece attaches the laser to a motor with a spiral-cut shaft to move it back and forth along two metal rods, once you remove the white piece, the laser should slide freely along these rods, and look something like this:
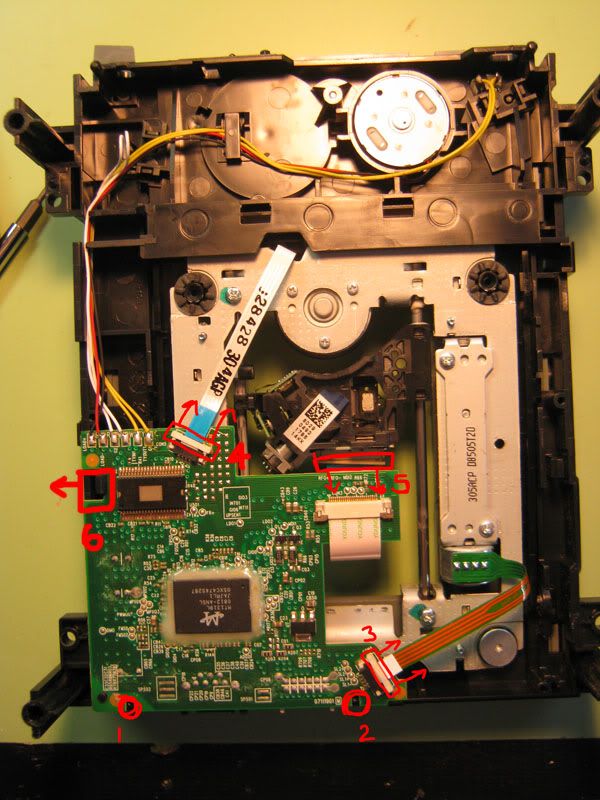
At this point we will flip the whole drive over, and finish dis-assembling it from the back.
1&2: remove two small phillips-head (+) screws from these holes
3&4: use your fingernail or a screwdriver or something with a flat edge to slide the white parts towards the rest of the cable, this should allow you to slide these ribbon cables out easily.
5: There is another ribbon cable connecting the laser to the printed circuit board, it like 3 and 4 but with 2 small clips on either side. (it may be easier to do this from the other side)
6: Finally, pull this tab away from the circuit board to unclip it from the dvd drive chassis you should be able to flip the board over and set it next to the dvd drive. you now have access to the laser.
you should now have something that looks like this. Remove the 4 oddly-shaped screws with your torx 6 screwdriver, and be careful not to wreck the rubber sleeves as you remove them. now, carefully lift out the entire metal piece with the rods and motor and laser.
here's what it should look like once you remove it. at this point you want to detach the laser from the rest of the assembly. There are 4 screws that hold 4 metal plates in place. The plates hold down the 2 rods which the laser rides on. you only have to remove one rod to get the laser out, and that is the side which the rod goes through 2 holes in the laser. Remove the screws and you should be able to take the plates, and rod out and slide the laser right off
after i took the plates out.. this part gets a little messy, be careful not to get grease on your electronics or other critical components.
IMPORTANT!!!! before you install your new laser, you must remove this bead of solder so that you can see 3 SEPARATE contacts. Look at your old laser to see what it should look like. I got rid of the solder by heating up my iron, touching it to the solder to melt it, then flicking it off with a toothpick. (I know there are more professional methods to doing this but i didn't have anything handy)
Once your laser is de-soldered you can out it back on the rod, and put the laser assembly back together. screw everything back together and hook up the cables, and you're good to go!
Hope this was helpful, PM me with any questions of just post them in this thread. Good luck!!!