|
|
|
PS2 Games Stuttering And Skipping... Slow loading times..Or Just Not Booting Up At All? Take A Look Inside
|
|
AfterDawn Addict
1 product review

|
14. February 2006 @ 05:51 |
 Link to this message

|
'Round about 75% of backups which do not work, or do work.. but stop or skip, is because of bad media.
Most people who encounter problems with their PS2.. a lot of the time it is a result of bad media being used.
Taken from - Digital FAQ
1ST CLASS MEDIA
Almost flawless burns with 95-100% reliable results:
PVC = Pioneer (Japan) = (-R)(-RW) ... media is no longer made
MXLRG0x = Maxell (Japan) = (-R)(-RW)
YUDENT, TYG0x = Taiyo Yuden,Verbatim (Japan) = (-R)(+R)
MCC, MKM = Mitsubishi Chemicals (Singapore/Taiwan) = (-R)(-RW)(+R)(+RW)
SONY0xD = Sony (Japan/Taiwan) = (-R)(-RW)
2ND CLASS MEDIA
Decent discs, though not perfect, about 80-95% success rate:
RICOHJPN = Ritek or Ricoh (Taiwan) = (+R)(+RW)
PRODISC = Prodisc Media (Taiwan) = (-R)(+R)
RITEK = Ritek (Taiwan) = (+R)(-R)(-RW)(+RW)
FUJIFILM = Fuji = (-R)(+R)
OPTODISC = Optodisc = (-R)
INFODISC = Infodisc Media = (+RW)
3RD CLASS MEDIA
Quality can be very questionable, about 50-80% success rate:
LEADDATA, LD01, LD, LEDA = Lead Data = (-R)(-RW)
BEALL = Samsung BeAll (Taiwan) = (-R)(+R)
MBI = Moser Beaur (India) = (-R)(+R)(+RW)
MAM-A, MAM-E (USA, Europe) = Mitsui = (-R)
PRINCO, fake TDK = Princo (Taiwan) = (-R)(-RW)
ONIDTECH = Ul Tran Technology (Taiwan) = (-R)
MUST = Unknown OEM = (-R)
GSC001, GSC002 = Gigastorage (Taiwan) = (-R)(+R)
CMC, CMCMAG = CMC Magnetics (Taiwan) = (+R)
PHILIPS = Philips (Taiwan) = (+RW)
4TH CLASS MEDIA
Pathetic garbage media, landfill material, about 0-50% success rate:
CMC, CMCMAG = CMC Magnetics (Taiwan) = (-R)
PIODATA, PIO = LeadData/ Ritek (Taiwan) = (-R))(+R)
OPTODISC = Optodisc (Taiwan) = (+R)(+RW)
LONGTEN = Jilin Qingda ??? (China) = (-R)
YIJHAN = Yi Jhan Technology (Taiwan) = (-R)
ALL FAKE MEDIA = mostly InfoSmart (HK), E-Net (UK) and Mitsui (USA,Europe)
AN31, AN32, ANWELL, AN30 = "default" stamper code (usually Infosmart) = (-R)
AML = Advance Media Limited (Taiwan) = (-R)
INFOSMART, ISO001 = Infosmart (China) = (-R)(+R)
DAXON = BenQ/Acer (+R)(-R)
VANGUARD, VDSPMS = Unknown OEM = (-R)
UME001 = UmeDisc (Hong Kong) = (-R)
WFKA = Wealthfair Investment (China) = (-R)(+R)
ANYTHING ELSE = Unknown OEM or NEW
Can media ever change class? Sure. But it rarely happens. LD01 moved to the top 3RD class spot (got better) and RITEK media moved to the last 2ND class spot (got worse). CMC DVD+R moved up to 3RD class, and SONY0xD moved to 1ST class. But those are the only four major moves to date. It is not a quick move either, these things take much time and many tests.
What do the % numbers mean? This list is constructed from many tests on many burners from a handful of experienced people that use a lot of media. These numbers reflect the number of discs in a spindle that will give good results. For example, out of a 100 spindle of media, 1st class discs may kick out a few bad discs (0% to 5% of the media may have playback imperfections or be outright bad burns). The 2nd class media may have a dozen or so bad discs. The 3rd class discs could give you a half-spindle of duds. And the 4th class stuff can be pure trash. These are mean averages too, simple statistics math, meaning best tests and worst tests are discarded, and the middle range of tests is the basis for these numbers. You may sometimes find the rare instance where a CMC spindle will be perfect and a Taiyo Yuden spindle will be completely flawed, but those times are the exception rather than the rule (and are not part of a mean average).
Testing procedures: Burns are subject to playability/reflectivity tests (usage tests), as well as software verification. Test equipment is under controlled hardware/software environments to eliminate user variables. Burns are at least 4GB or more to test the entire length of the media.
Exceptions to the "Taiwan" rule: Not too long ago, Mitsubishi and TDK moved their operations to Taiwan. In fact, some of it apparently is being made in CMC Magnetics plants. However, because MCC and TDK are still using the same high quality methods and materials (this has been confirmed by a Verbatim spokesman), this geographic relocation has not affected the quality of their products.
Why is a specific media ID (like MCC02RG20) not shown? When a certain base media ID shares the same quality, not every single code will be listed. For example, the "RITEK" classification include RITEKG03, RITEKG04, RITEKG05, RITEKW, etc. Same for "MCC". It includes MCC01RG20, MCC02RG20, MCC003, etc. Simplicity. An "x" has often been used in place of numbers, saving space by writing merely "TYG0x" instead of creating a long list of TYG01, TYG02, TYG03, etc.
Fakes
Luckily, it does not happen often, but it does happen often enough to be a major annoyance to media buyers everywhere. Most fake media comes from Hong Kong, as a general rule. Fake media tends to float around Europe and Asia more than it does the USA. Fake media is normally sold in flea markets, on eBay and online. Major brand name media sold in stores is probably never going to be fake.
TYG02 = This was faked by INFOSMART (Hong Kong) in 2004-2005. Some OPTODISC media was also reported to carry this code. Mitsui is also faking them in their USA and Europe plants. The fakes are rumored to be for "improved 8x media detection" but low quality media is low quality, regardless of the media ID.
MCC02RG20, MCC003 = This was faked starting in mid 2005, again by InfoSmart of Hong Kong.
TTG02, TTH01, TTH02 = These are apparently "legal" fakes made by Mitsui, with permission by TDK to use the code. However the media is quite poor, not true TDK media. Another 2005 fake.
MXLRG01 = This was faked by INFOSMART (Hong Kong) in 2002-2003.
SONY = This was faked in 2003. Unknown HK manufacturer. "SONY" is not a valid media ID.
Pioneer brand = Pioneer's PVC quit manufacturing blanks in 2003 (PVC media codes). LeadData and Ritek tried to sell their PIODATA and PIO coded blanks under the "Pioneer" brand name, but that was fake.
TDKG02 = This was faked by PRINCO in 2001-2002. They wanted to "improve 2x writing" on the 1x write strategy media, as well as insure drives would see the media (not all firmware at the time had PRINCO as a valid media code).
RITEKG03,RITEKG04 = This was supposedly faked in 2004. However, it is the opinion of this author that it was just a lame cover story by RITEK for providing subpar quality media, as even the "legit" media performed poorly at the time.
Branding Guide
Although this will change on a regular basis, the following brands are known to use the following media makers for their outsourced discs. Be careful for CMC and PRINCO discs, as those are becoming more common in those "special sales" seen almost every week since early 2004. Some companies prefer dollars over quality, so be careful. Also be especially careful of "house brands" or no-names. Stores like Fry's and CompUSA have horrible return policies too, so if you end up with an unfavorable media ID, do not burn a test, just take it back for a refund and take your business elsewhere. Because of recent trends, the BOLDFACE represents known media at the time of this publish. Others are either past media codes, or codes available to the manufacturer. The (-R) and (+R) has also been added if only one is using that code.
Accu = LEADDATA
Americal = RITEKG01, PRINCO, LEADDATA
Apple = MXL, MCC(-R)
Arita = RITEKG03, RICOHJPN
BenQ = DAXON, FUJIFILM
Bulkpaq = Fakes TY/MCC, PRINCO, ISO001(+R)
CompUSA = PRINCO(-R), AML, OPTODISC, LD
Datawrite = PRINCO, PRODISC, AN31, RITEKG03
DupEZ = PIODATA, LEADDATA
ESA = CMC
Esbuy = RITEK, LEADDATA, other budget IDs
Fuji = TY(-R), MKM(-RW), MCC, RICOHJPN(+R), PRODISC(-R), FUJIFILM, RITEK
GQ = PIODATA, PRINCO, RITEKG03, RITEKG02, LEADDATA, LD
HP = CMC, RICOHJPN, MCC
Imation = MCC02, RITEKG03, CMC
Intenso = MCC01
KHypermedia = CMC, TTG01
Kodak = Various budget IDs
LiquidVideo = OPTODISC
Matrix = MATRIX, LONGTEN, YIJHAN, MUST
Maxell = MXL, RITEK(-R/Taiwan), RICOHJPN, TYG01
Memorex = MCC003, RITEKG05, RITEKR03, CMCMAG, RICOHJPN,
Memorex (more) = PRODISCS0x, INFODISC, MBI, MCC01
Meritline = Various budget IDs
Mirror = AN31, ONIDTECH, PRINCO
Optodisc = OPTODISC
Philips = CMC
Pioneer = PVC
Princo = PRINCO, Fake TDK
Prodisc = PRODISCS0x, PRODISCF0x, MCC01, MCC02
Ridata, Ritek = RITEKG0x, RITEKM0x, RITEKR0x, RITEKW, RICOHJPN
Samsung = TYG01, BEALL, RITEK
Sonic, Shop4tech = LONGTEN, MATRIX, MUST, YIJHAN, various budget IDs
Sony = SONYD0x, YUDEN, RICOHJPN, MCC
Supermedia, Linkyo = Various budget IDs
TDK = TY, YUDEN, TTG0x, TTH0x, RITEK, RICOH, MXL, CMC(+R), MCC, TDK
Teon = MCC003(+R), CMC(-R)
Verbatim = MCC02, MCC, MKM(DL), CMC, YUDEN,
RICOHJPN, RITEKG03
The PS2 laser inside the system, is fragile and sensitive. If you insist on using bad quality media, you're gonna wear the thing out much quicker (something which I have learn the hard way after previously using all the bad stuff, but I now use Verbatim!) which I'm sure you don't wanna do to your nice little friend no?
Personally, I use the Verbatim DVD-R 8x and burn at 4x and have backed up 75+ PS2 games which all run flawlessly.  DVD-R-8x-oben-d.jpg" border=0> DVD-R-8x-oben-d.jpg" border=0>
Yup, that's those.
Now, occasionally, games need a re-build with a size of 4.36-4.38gb. To do this, follow the steps below!
Tools Needed & Where to Download:
DVD Decrypter :
Legal issues stopping me from linking, all I can say is search google for it, and the 4th link..
IsoBuster
CD/DVD ROM Gen
Apache 2
The Guide :
The Example I will be using here, is Metal Gear Solid 2 : Substance
1. Click MODE>ISO>READ
Then click the little browse folder icon and choose the location/filename of the ISO but I reccomend keeping in the root of the drive for ease.
2.Then click the DVD>HDD button.
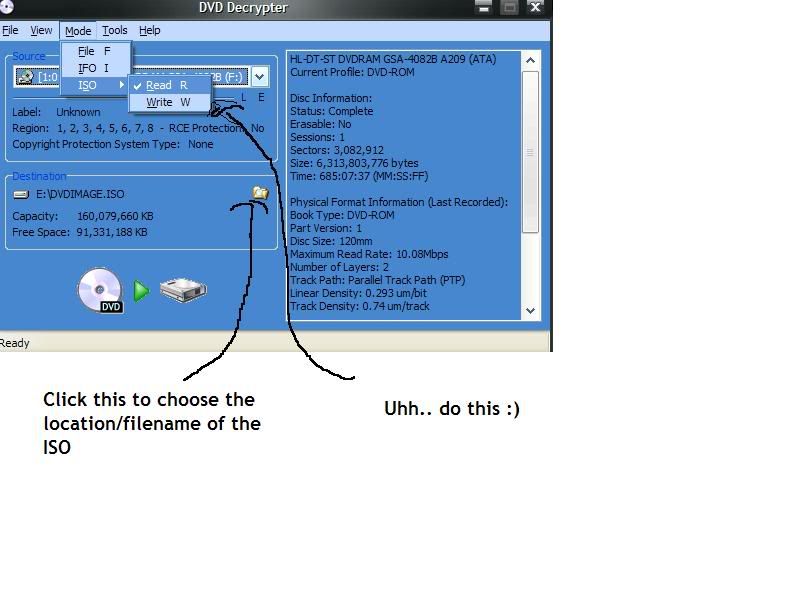
3. Now.. take a quick look at the size of the game ISO. 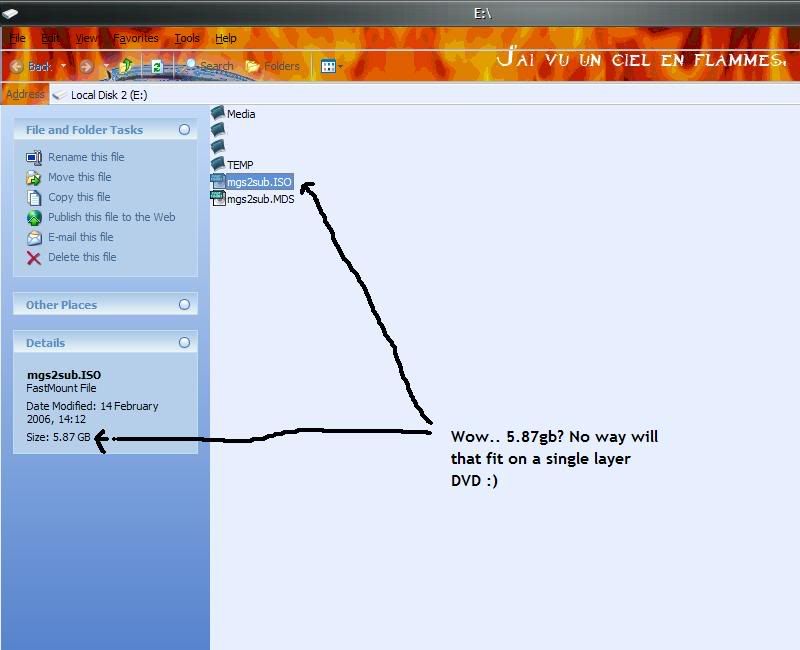
If the ISO size is bigger than 4.36-4.38gb than it will need a re-build.
So.. now open IsoBuster, click file then open image file.
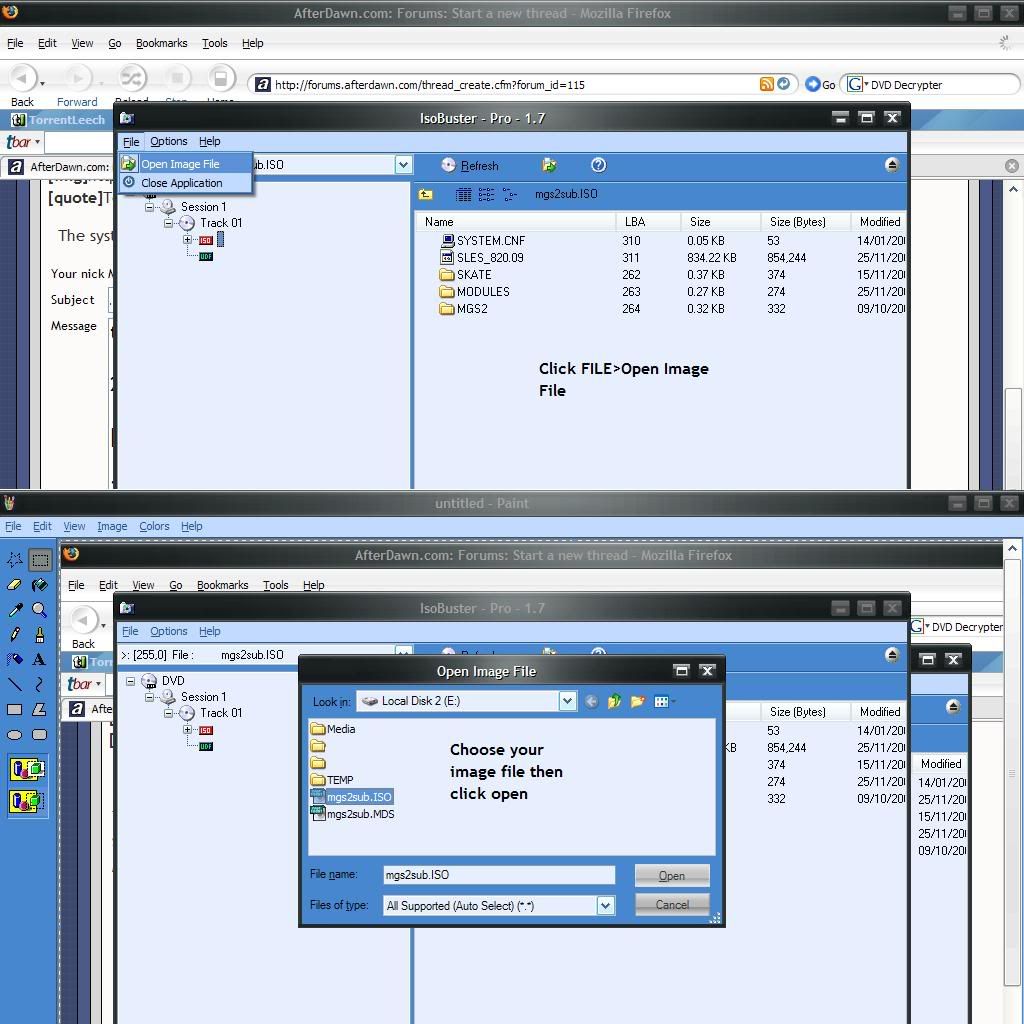
Then open your image file!
Highlight the objects which have just appeared, right-click and choose extract objects.
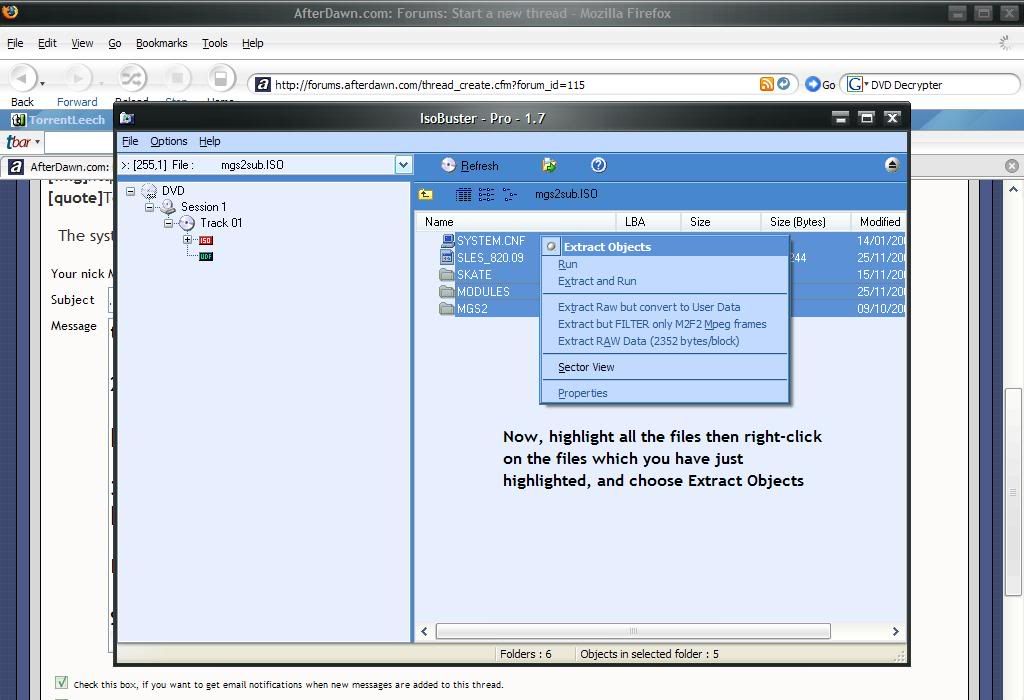
Now choose where you want the objects to go (I suggest you make a folder beforehand so you can keep the files close to where the ISO is, again I suggest the root of the drive)
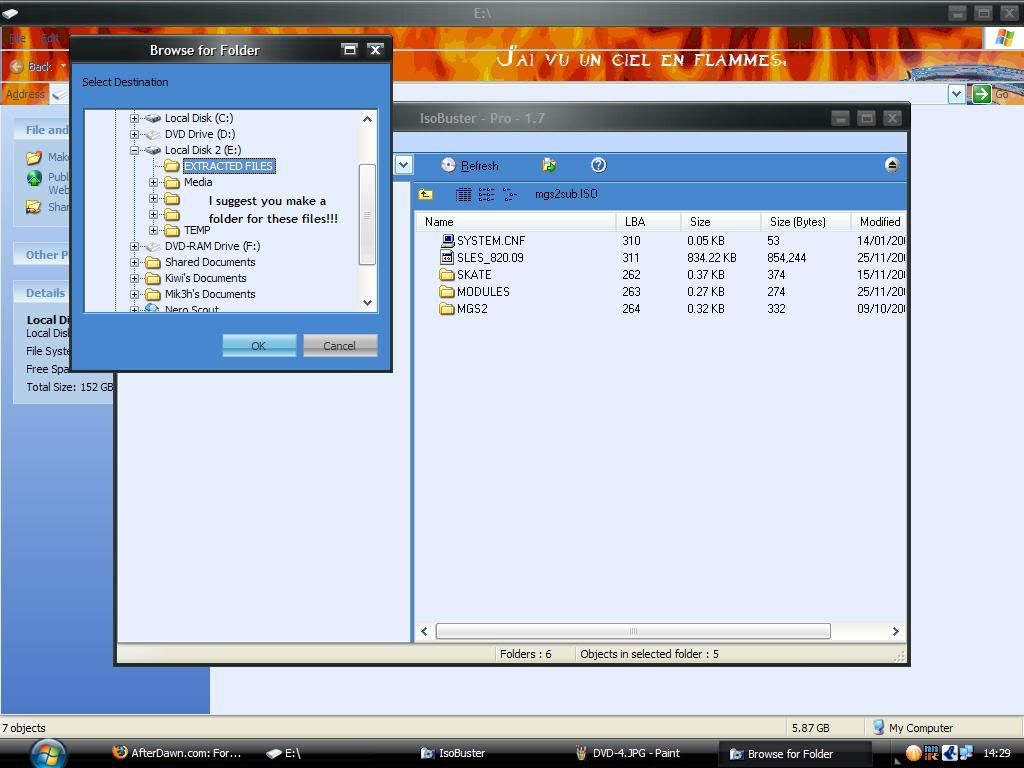
Now the extraction process will begin!
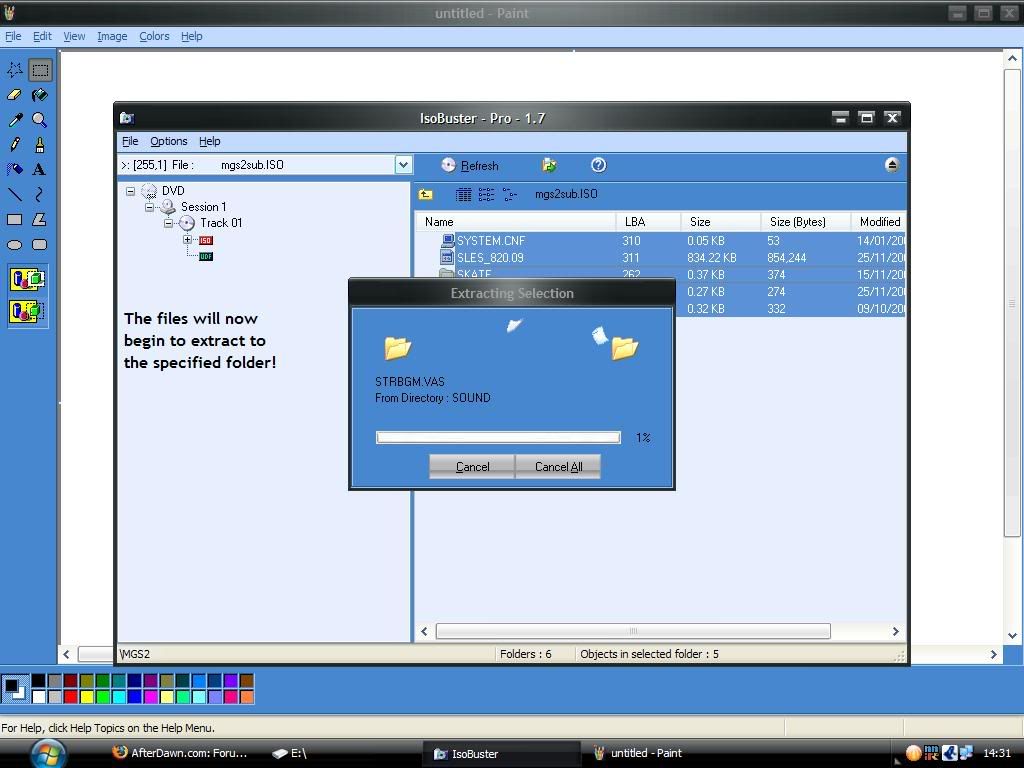
Now you should notice how big a difference there has been between the original ISO size and the re-build size. 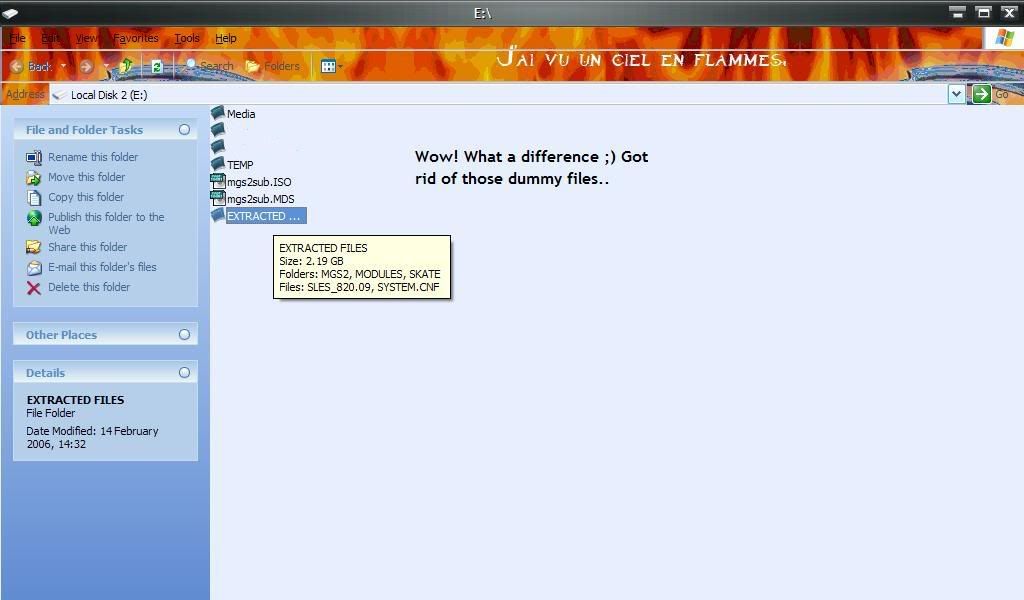
If not, skip the rest of this guide, and just burn the ISO.
You can do this by opening up DVD Decrypter, and clicking MODE>ISO>WRITE, loading the MDS of ISO if the MDS file is not present, then setting the speed (should be half the maximum disc speed - this differs between disc brands) then clicking the HDD>DVD image.
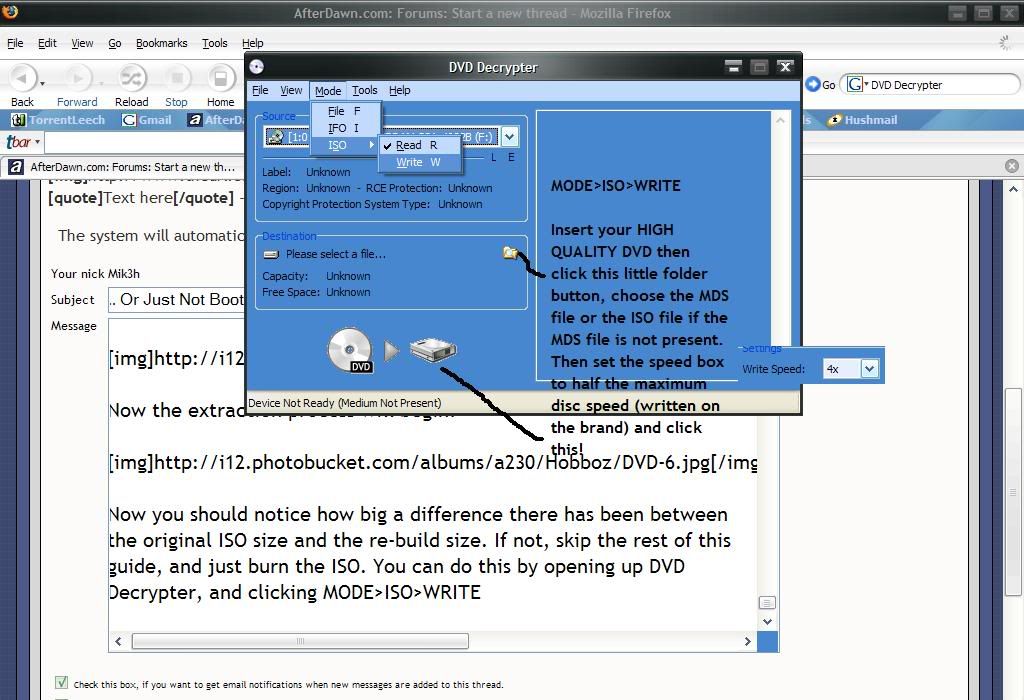
Ok, open up IsoBuster again, and load up the image again 
[/img]
Keep this open, open up CD/DVD Generator choose new project, then choose - DVD-ROM Master Disc.
Ok, take a look at the order of the files in IsoBuster. Now move those files in the same order from your extracted files folder onto the CD/DVD Generator in the exact same order
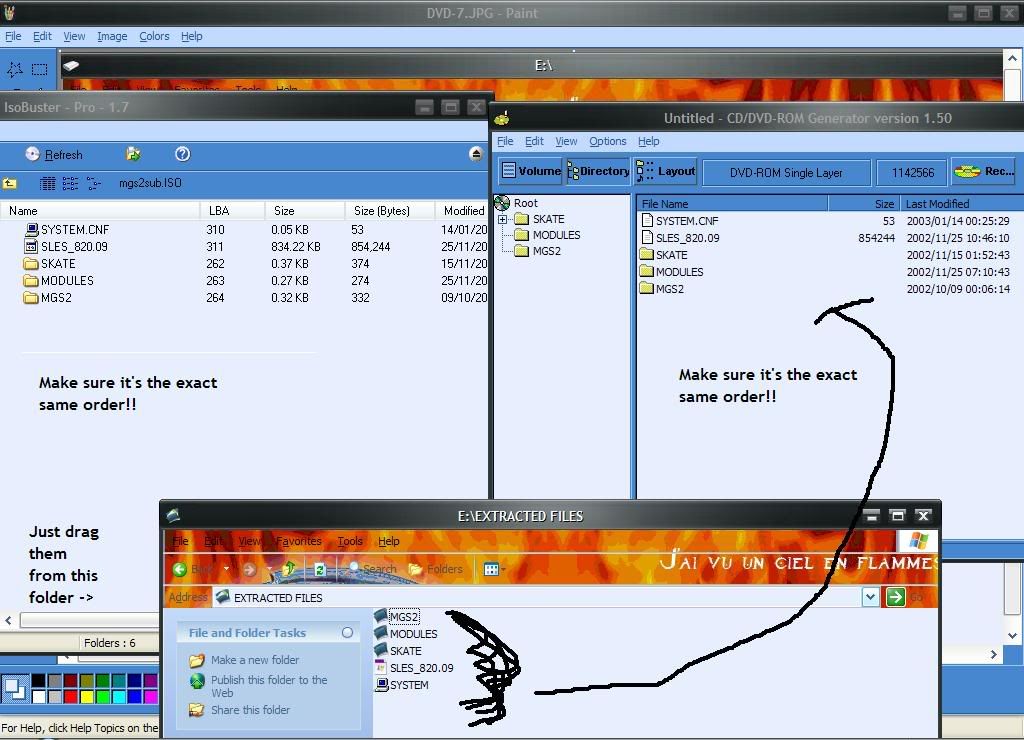
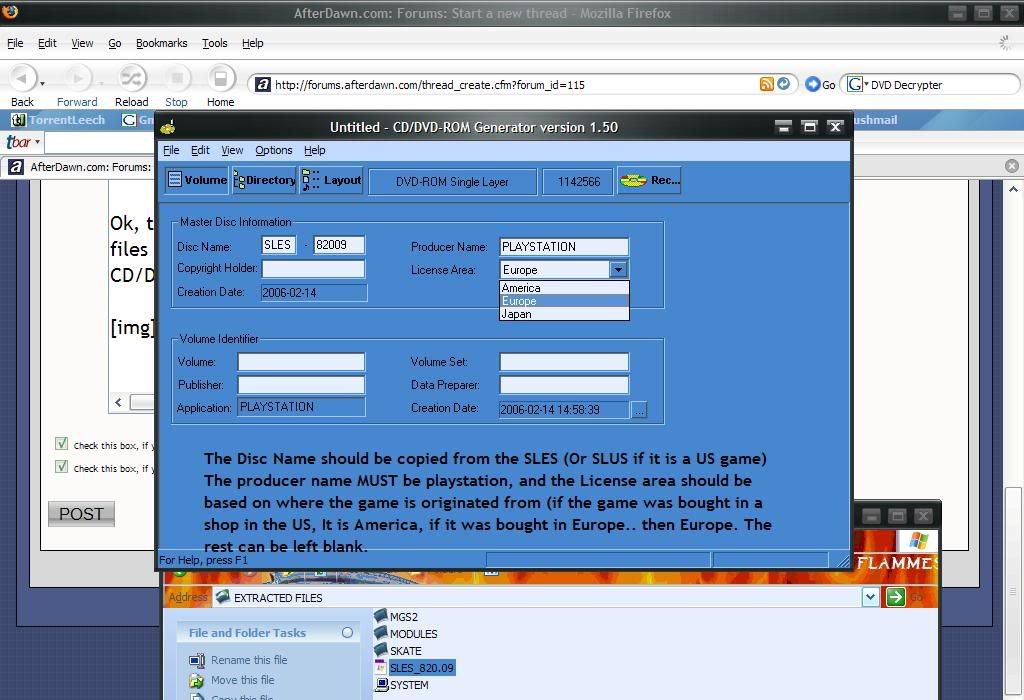
Now click volume and fill out the information.
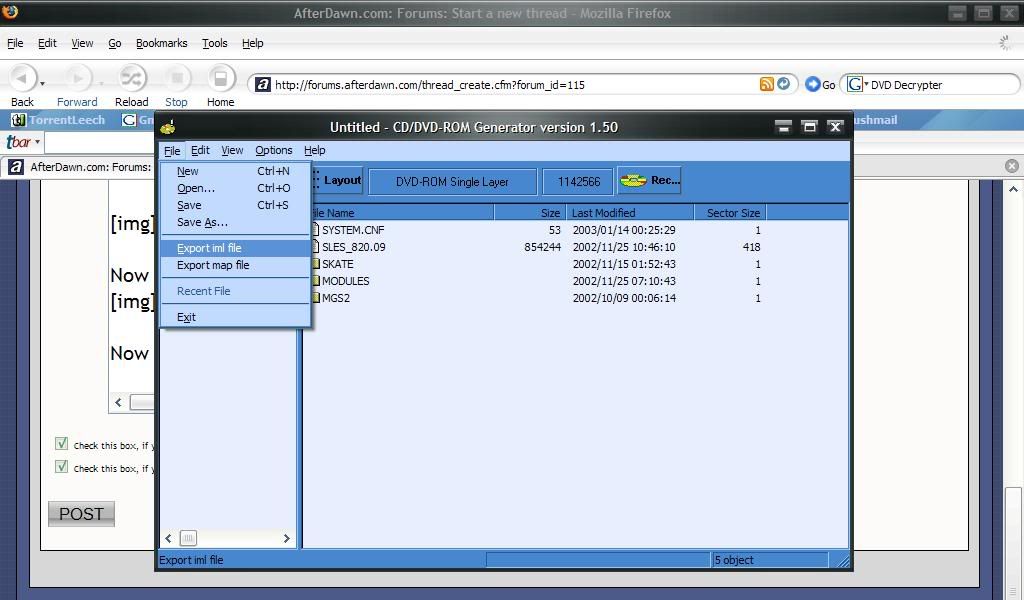
Now click file and click on export IML file.
Call it whatever you want, but save it beside the ISO/FILES.
Choose no when it asks you to save the project.
Now, open up Apache2.
Click file then import IML.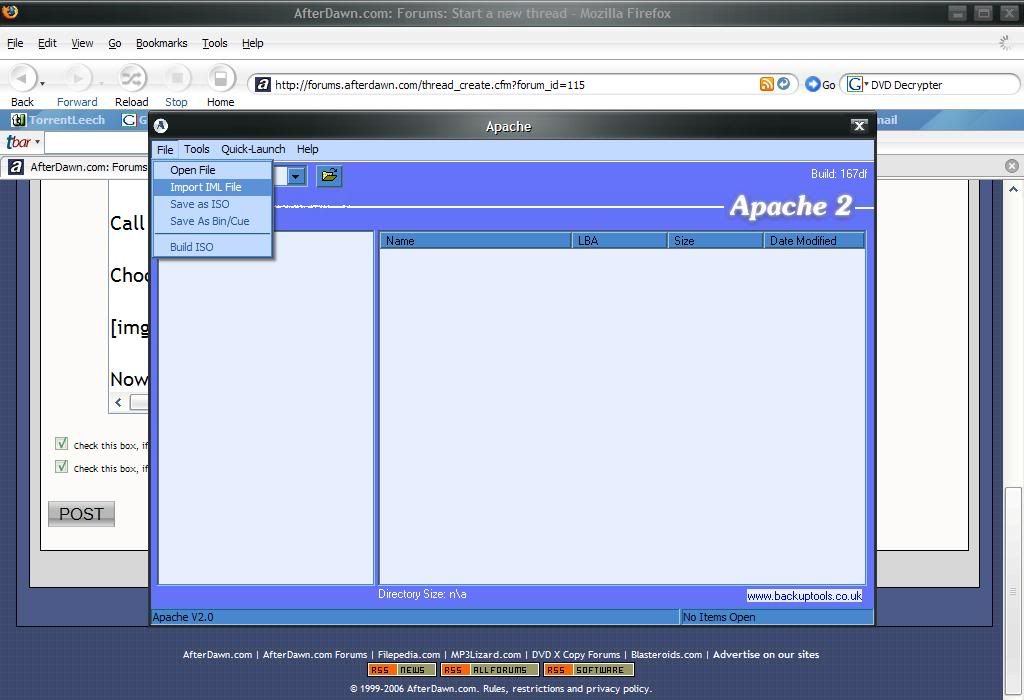
Choose your IML and click open
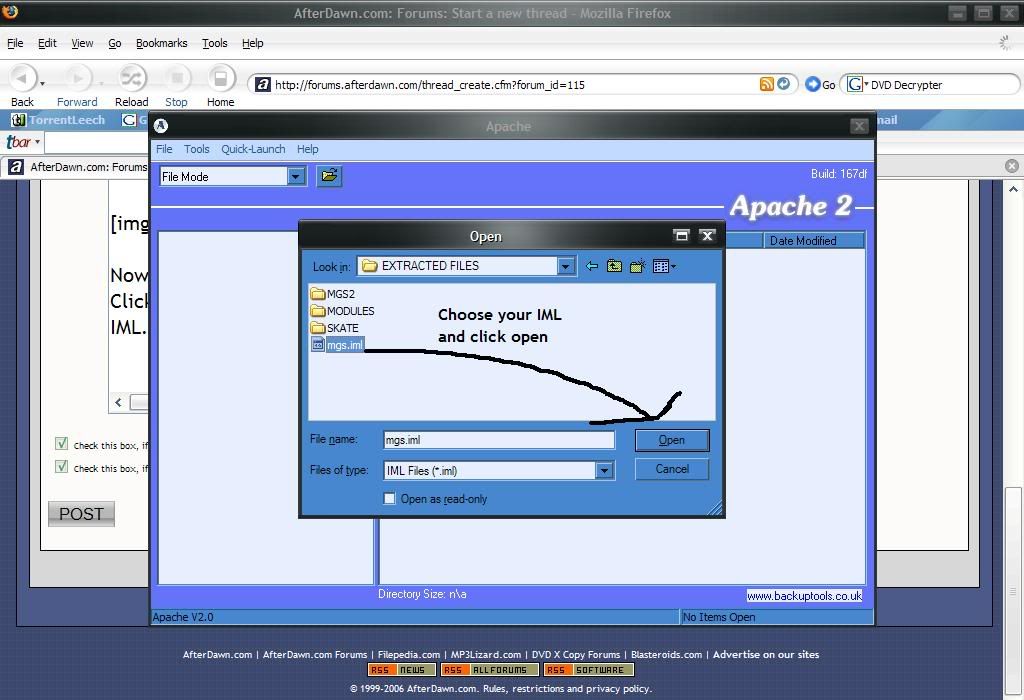
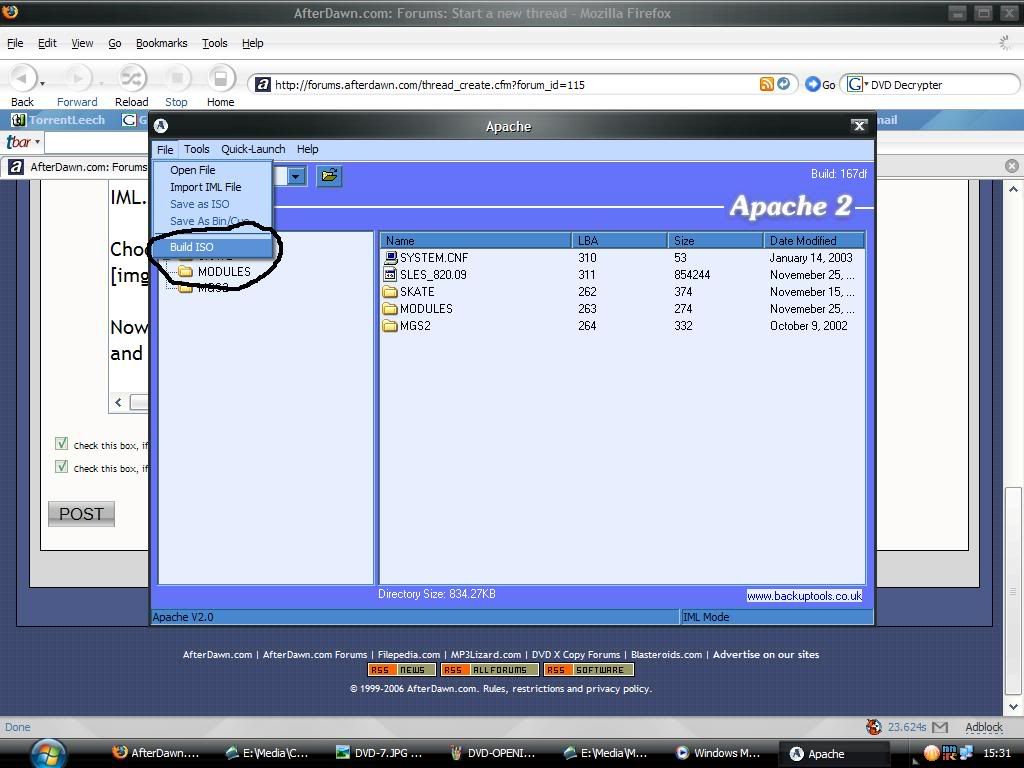
Now you will be presented with all those files from before. Click File and at the bottom, choose Build ISO.
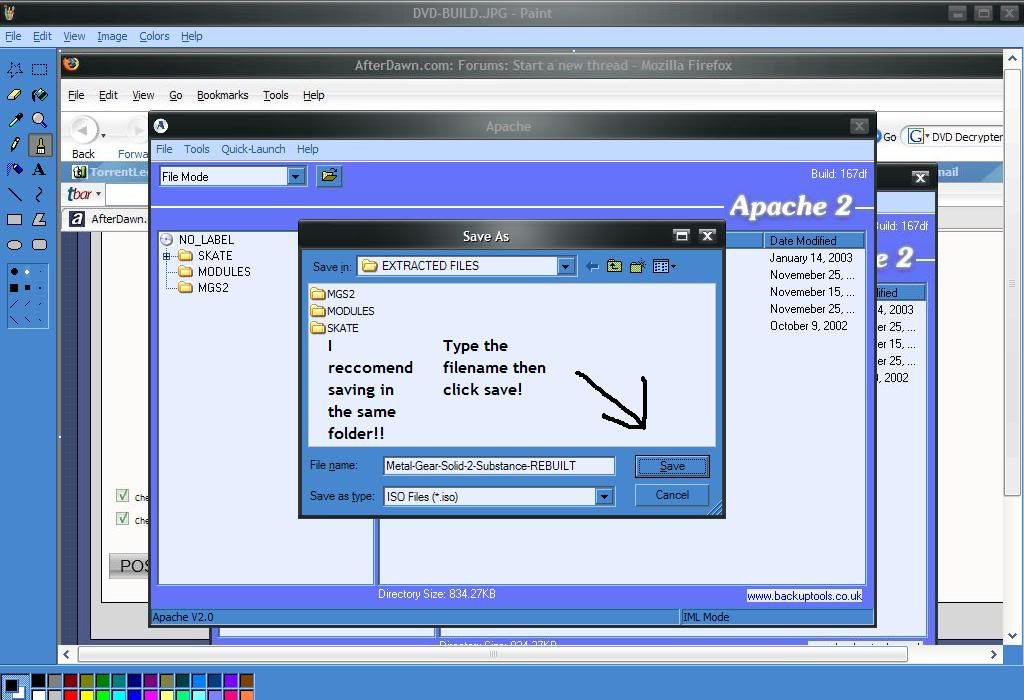
Now choose your filename and click save. Again I reccomend saving in the same folder..
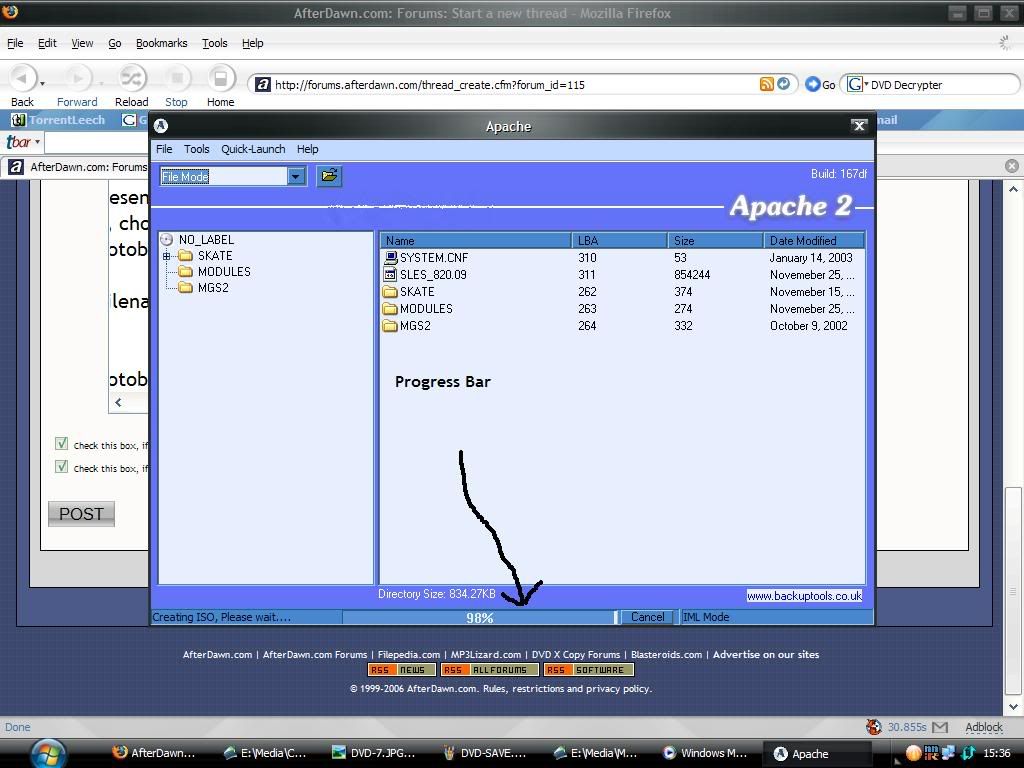
The program will now begin to build the ISO from the order of the IML files.
Now, we're nearly there :)
*Note that if you need to patch the region, or DNAS ID if the game is online or if you need to patch the video mode for it to play in colour on your machine, do it now!*
Ok, now we need to burn the ISO using DVD Decrypter (or you can use a different program if you wish, but this guides covers using DVD Decrypter.)
You can do this by opening up DVD Decrypter, and clicking MODE>ISO>WRITE, loading the MDS of ISO if the MDS file is not present, then setting the speed (should be half the maximum disc speed - this differs between disc brands) then clicking the HDD>DVD image to burn it onto you're HIGH QUALITY DVD which you can play on your PS2 with a modchip/Swap Magic/HDD Loader

Now once it has finished, you're done!
Having internal problems? Lasers sounding weird, getting a... Disc Read Error?
Read On.
During the repair of your Playstation 2, we'll be taking the device apart. Most of the supports will be taken out, so be careful you don't bend or break any of the connectors on the various ports or internally. We'll also be taking apart the loading tray. This includes a Class 1 laser, which can blind you. The easiest precaution is to make sure your PS2 is left off when the disc tray is open. I also cannot be held responsible if you "fugger" up your machine whilst trying to repair it. If you are not confident with you're skills. get someone else to do it ;)
We're only going to need a few tools for this. Grab your PS2, a normal-size Phillips and a flathead screwdriver, a small or jeweler's size Phillips screwdriver, a can of compressed air, and one each of (if you own any): a DVD, a PSone game, a silver PS2 game, and a blue PS2 game (namely Contra: Shattered Soldier). I've chosen Army of Darkness, Final Fantasy Tactics, GTA: Vice City, and Contra. To my knowledge, there is only a handful of blue games, so if you don't have one there's no need to worry.

To begin with, remove any add-ons you might have for your Playstation 2, like the Network Adaptor. They'll just get in the way. Flip the Playstation 2 upside down and remove all the rubber feet and square tabs. Get the edge of the flathead screwdriver or a knife underneath them to pop them out. I've circled them on the picture below ? 4 rubber feet and 6 square tabs. There's a few you can leave on, but they might get in your way later.

Remove all the tabs.

Ok, now let's open her up!
In the next step, we're going to take out the 10 screws under all these tabs. You'll need the Phillips head screwdriver for this part and you might want to mark where each one comes from. They're of two different lengths, so if you make a mistake putting them back there's only one other type of screw that might fit. Once the screws are all out, take the bottom cover off. Flip your Playstation 2 over again so it's right-side up. From back to front, peel up the cover and slide it forward, then lift it off. Be careful of the memory card, controller ports and the loading tray. Once you lift the cover free, you'll notice a ribbon connecting the power and open/close buttons to the chassis. Lay the cover down as best you can without putting any tension on this ribbon.

Lift the bottom off..

Turn it over..

. . . lay the top on its side to avoid cutting the cable..

And remove the screws.
The last piece to remove is the black lid over the loading tray. There's four very tiny plastic screws holding it in. They're circled in red in the picture above. This is where you'll need the jeweler's screwdriver. Remove all the screws and lift the lid off. Voila! Now we have access to all the guts!

You're about two-thirds of the way done. Bring your Playstation 2 back over to your TV and plug it back in. It's time to test out all the games and find out what's wrong. You'll also need the black cover that goes above the loading tray, your games, and a dark felt-tip marker. The can of air can't hurt either.
After you plug the PS2 in, hit the eject button. Be careful, it's on the lid dangling by a cable. With the tray open, unplug the PS2. Now we have access to the lens and everything else underneath the tray. Spray it out with the can of air, but be careful not to spray the lens directly. Pick any hairs out in the general vicinity of the lens.

You can also use the master power switch on the back to turn the PS2 off.

Finally, what we've been looking for
You'll notice there's a white disc behind the lens that is circled in yellow with a red mark on it. This is a gear that adjusts the level of the lens. Don't touch it! Grab your felt-tip marker and mark the original position. If you're looking at the unit from the front, the left edge of the gear will be touching a silver plate, about where that red line is. Put a little mark perpendicular to this. If all else fails, you can always go back to this spot and it won't be any worse off than before.
Turn the gear clockwise a little bit. You will notice the lens rising a bit, as every clockwise turn raises the lens. Once you reach a certain point, however, the lens will drop all the way to the bottom and start moving up again. Thankfully, Sony was sane and the range of movement is exactly one turn of the gear. This means you'll always be able to return the gear to its starting position. Turn the gear clockwise until you hear a click and see the lens drop to the bottom.
As a side note, this is where I depart from other repair FAQ's. They always suggest adjusting the lens from where you find it, but starting at the bottom seems to give you the best chance of finding the real sweet spot for the lens.
Plug just one controller into the front of your PS2. With the lens at the bottom position, put a game in the tray. Start with your PSone game. Place the black lid on top of the tray and lightly but firmly hold it down. Too hard and your game will click as it tries to spin, too light and the lid will fly off!

Plug your PS2 back in and turn it on. The tray should close. Let's turn on the TV and see if it works!
After the splash screen, hit X to open the browser. Now we get to wait and see whether it loads!

You've been seeing this all too often lately

Success!
With any luck, it will load at least one of your games. That's great, but we picked out four different titles for a reason! I tried them one-by-one in this order: PSone, DVD, Silver PS2, and Blue PS2. The Blue is the most difficult, so after you get your first successful load, you may want to start with it instead of a PSone game.
If at least one of your discs doesn't load, don't fret. Eject your disc and unplug the PS2 with the tray open. Take the black lid off and let's look at that gear again. Turn the gear clockwise four clicks ? about 1/8th of a full turn. Pop the game in, put the lid back on, and try again. Repeat this until the games all show up in the browser window. Remember to turn the PS2 off between tries, as there's a class 1 laser in there.
Once you've got all your games showing up in the browser, try and load them. It's very possible that the PS2 will need some adjustments before it can play the games. Also, listen to the PS2. The lid is off so it will be much louder than normal, but grinding noises are still bad. This can occur if the lens is right up against the disc or if it's too far away ? you'll have to listen to how your own PS2 behaves, each one is slightly different. Again, the blue games, like Contra, are the most difficult to get to work. If you get this far, you're doing great!
Once you find a good position, test the heck out of it. Load all the games and DVDs, make sure they all start. With your DVD, scan ahead a few chapters. Turn it off, use the bathroom, come back and make sure it still works. Just like with your computer, as soon as you put the case back on and the screws in, you're that much more likely to remember you find something failing because you didn't test it. Try and load a saved game, too, just be careful with the memory card slots. They're wide open now and it's easy to pop it in at an angle if you're not watching.
Now that you're sure that everything's working, time to put it back together. Eject the tray, take your game, and let it close this time before unplugging it. Bring the PS2 back to your workbench to finish it up.
Start putting the screws back in. The black lid is held down by the four small screws. Just like when you were holding it down with your hand, screw them in so they're applying light but firm pressure. If you tighten them all the way, it will push the disc down even more. After that's on, slide the top lid back on ? careful about the ribbon and the ports again ? and flip the Playstation 2 over. Put the bottom lid back on and then start with the screws. Here's a picture again so you know where the long ones go ? they're the ones circled in red. Feet go on the four corners of the bottom section, regular tabs for the rest.

The long screws go in the red tabs, short ones everywhere else
Put your expansion devices back in place, hook the PS2 up to your TV and test it out again. If you're unlucky, you may have to crack the case again if something shifted. If need be, repeat the above steps until you get it right. Once you get it going, this should keep your PS2 playing all your favorite games for a long time coming.
If any of you have any questions or are having difficulty, please just post a comment and I will get back to you if not someone else will :)
-Mike
ps. Cheers to Hursty for pointing out that Mgs2 Substance is NOT a straight re-build. I only did this as an example. I know my methods, and they work, I did not intend on trying this game after a re-build. If it is MGS2 you want to re-build, then go here - http://forums.afterdawn.com/thread_view.cfm/280523
That is a guide for the rebuild of the PAL version of
Metal Gear Solid 2 : Substance.
Apparently the NTSC does not re-build but I'd love for someone to correct me on this.
Thanks.
UPDATE : Invalid links updated, thanks to "samjust" for that :)
This message has been edited since posting. Last time this message was edited on 18. January 2007 @ 13:28
|
|
Advertisement

|
  |
|
|
|
dg0896
Suspended permanently

|
14. February 2006 @ 10:22 |
 Link to this message

|
|
Thank you for adding that, all the newbies always ask questions about that. Now I don't have to awnser them.
This message has been edited since posting. Last time this message was edited on 13. October 2006 @ 20:20
|
AfterDawn Addict
1 product review

|
14. February 2006 @ 10:26 |
 Link to this message

|
|
No problem :) Thanks for the comment.
-Mike
|
|
sulaim
Suspended due to non-functional email address

|
14. February 2006 @ 10:41 |
 Link to this message

|
This message has been edited since posting. Last time this message was edited on 14. February 2006 @ 10:41
|
AfterDawn Addict
1 product review

|
14. February 2006 @ 10:59 |
 Link to this message

|
|
Ok, but only once/if a mod stickies this one ok? Just want this one to be stickied also as it is a common question asked.
-Mike
|
|
Integ
Junior Member

|
14. February 2006 @ 12:05 |
 Link to this message

|
|
Why when I extract from Isobuster does none of my games get any smaller? When I right click the folder after its full extracted it says exact same thing as the original ISO. I know I followed the steps to the T. No use continuing if my Image won't shrink.
also both games I am trying to rebuild contain some variation of a PAD file. are these dummy files? The games are Soul Calibur III and NBA live 2006.
Please help me, I don't want to keep bothering about this. I just want to rebuild a couple games.
|
AfterDawn Addict
1 product review

|
14. February 2006 @ 12:12 |
 Link to this message

|
|
Do the games actually need rebuilt? If the image won't shrink or doesent shrink by much, then it probably doesent need shrunk. But if it's a case that it won't fit on a DVD, and it won't shrink after ripping the files, then there may be files you need to take out manually.
Post back letting me know what the case is.
-Mike
|
|
Integ
Junior Member

|
14. February 2006 @ 12:16 |
 Link to this message

|
|
are you telling me to pull the pad files they are BIG and replace them with text versions. also if the file says Pad_0.dat should I do a Pad_0.txt? thanks for the hasty response.
|
AfterDawn Addict
1 product review

|
14. February 2006 @ 12:24 |
 Link to this message

|
|
Before you do anything, you must determine if the game actually needs to be rebuilt to be burnt onto a DVD before starting to edit the files if the extracting does not work!
-Mike
|
|
Integ
Junior Member

|
14. February 2006 @ 12:26 |
 Link to this message

|
|
Isn't it common knowledge that these 2 games need to be rebuilt?
|
AfterDawn Addict
1 product review

|
14. February 2006 @ 12:28 |
 Link to this message

|
|
Do they fit on a disc.. and have you tried burning them?
-Mike
|
|
Integ
Junior Member

|
14. February 2006 @ 12:36 |
 Link to this message

|
|
yes, and yes. I put them on TYG02 8x from supermediastore burned at 2.4 and 4x. twice a piece using my BenQ with bcbd(updated firmware).
NBA live after rebuilding once gets the game to load but freezes when I go to he loading screen to start a match. Soul Calibur kicks me to the disc browser screen. I have no problems playing the following back ups:
God of War
Warriors
Shadow of Colossus
NFS Most Wanted
thanks for taking the time, I appreciate it.
|
AfterDawn Addict
1 product review

|
14. February 2006 @ 12:40 |
 Link to this message

|
|
Are the TYG02 Verbatim or Tuiyo Yuden? And if a game is taking you to the browser screen, that means something's probably up with your laser. Try cleaning it or re-aligning it as stated above.
Also, what program are you using to burn the games? You should always burn 8x media at 4x.
-Mike
|
|
Integ
Junior Member

|
14. February 2006 @ 12:43 |
 Link to this message

|
|
their yudens and I use DVDdecryter and I burn at 4x 99% of the time unless it doesn't work.
How do I clean the lens? I have a disc cleaner its a disc with a brush on it.
|
AfterDawn Addict
1 product review

|
14. February 2006 @ 16:42 |
 Link to this message

|
|
Use Isopropyl alcohol. On a q-tip cotton bud as mentioned in the above guide..
-Mike
|
AfterDawn Addict
1 product review

|
14. February 2006 @ 16:42 |
 Link to this message

|
|
Request for this thread to be stickied, mods!
-Mike
|
AfterDawn Addict

|
14. February 2006 @ 20:08 |
 Link to this message

|
|
This definitely deserves a sticky. Nice Guide Mik3h. *Powers up to Super Saiyan 3 and fires a Kamehameha in the direction of DDP and Creaky to get their attention.* C'mon mods stick this bad boy, it's full of useful info. Cheers!
|
|
sulaim
Suspended due to non-functional email address

|
14. February 2006 @ 20:39 |
 Link to this message

|
|
two words:
Sticky this
two more words:
Sticky this
two more words:
Sticky this
two more words:
Sticky this
mods, i hope u get the message.
|
Moderator

|
14. February 2006 @ 23:30 |
 Link to this message

|
|
stickied..
enjoy :)

Main PC ~ Intel C2Q Q6600 (G0 Stepping)/Gigabyte GA-EP45-DS3/2GB Crucial Ballistix PC2-8500/Zalman CNPS9700/Antec 900/Corsair HX 620W
Network ~ DD-WRT ~ 2node WDS-WPA2/AES ~ Buffalo WHR-G54S. 3node WPA2/AES ~ WRT54GS v6 (inc. WEP BSSID), WRT54G v2, WRT54G2 v1. *** Forum Rules *** |
AfterDawn Addict
1 product review

|
14. February 2006 @ 23:37 |
 Link to this message

|
|
Hehe thanks! :)
Already PM'd Creaky and ddp about stickying it, so It shouldn't be long :)
-Mike
EDIT : Just noticed it was stickied, cheers!
This message has been edited since posting. Last time this message was edited on 14. February 2006 @ 23:37
|
|
sulaim
Suspended due to non-functional email address

|
15. February 2006 @ 00:35 |
 Link to this message

|
|
nice work.
i hope it reduces useless threads and annoying repititiive questions.
|
AfterDawn Addict
1 product review

|
15. February 2006 @ 01:26 |
 Link to this message

|
|
Thanks. Yeah hopefully.
-Mike
|
|
dg0896
Suspended permanently

|
15. February 2006 @ 02:10 |
 Link to this message

|
|
I hope so but probably not because the newbies always ask the same question. But now if they do we can just give them the link to this guide.
This message has been edited since posting. Last time this message was edited on 13. October 2006 @ 20:20
|
Newbie

|
19. February 2006 @ 22:16 |
 Link to this message

|
Hey,
First I wanna say, your a legend, thats the greatest, most helpful guide ever!
Now to my problem. Everything is all good, cept I'm unsure about something. My PS2 version (SCPH-50002, PAL), has a different DVD drive, to your guide. The white cog used to calibrate it, is actually two cogs. One in each corner (sorry, no pic...yet). My better judgement would point to adjusting both cogs at the same time...? Do you know if this is correct?
Thanks again!
EDIT...Pictures!
Here is the most important one probably, hopefully its not going to come out huge or I'll have to photoshop it.

Basically, look to the right where the ribbon goes. Those two white cogs. Thats what I'm unsure about.
The rest of the pictures (two others) can be found here: http://www.iinet.net.au/~starstuff/PS2
Thanks again.
This message has been edited since posting. Last time this message was edited on 20. February 2006 @ 17:11
|
|
Advertisement

|
  |
|
AfterDawn Addict
1 product review

|
21. February 2006 @ 08:30 |
 Link to this message

|
|
Hmm.. I think the two cogs is to make it better for the machine to read, if sony were to try and fix it, they would be able to align it more accurately.. hmm.. all I can suggest, is turn the two cogs until the laser drops.. and then when turning them (anticlockwise) use both cogs and turn them both at the same time. It to no avail.. just try one.. it is just a matter of trial and error! If you totally give up, take it into
a local store.
Thanks :)
-Mike
|
|


