|
|
|
GUIDE:Customize your PSP by yourself
|
|
Member

|
27. July 2008 @ 17:11 |
 Link to this message

|
OK here in this guide I will show you on how to:
-Install Custom RCO Themes
-Make PTF Themes
-Make CTF Themes
-Make RCO Themes - NOTE **This will be edited in some time!!Coming Soon!!**
-Convert RCO Themes to PTF Format
-Make XMB Wawes
-Install Gameboots
-Debrand Gameboot
-Change hombrew icons
Warning:Your doing this on your own risk
------------------------------------------------------------------
------------------------------------------------------------------
HOW TO INSTALL CUSTOM RCO THEMES
In this tutorial you are messing with flash 0. So if you don´t folow the step excatly like i write it, then you can maybe brick your psp, so do this on your own risk and I´m not responsible if anyone´s psp get bricked.
1.Access your PSP recovery menu. To do this you fully shut down your PSP by holding the power switch until the PSP shuts off, then you turn it back on while holding the R button.
2.You scroll down to and select "Advanced". From there select "Toggle usb (flash0)".
3.On your computer, go to "My Computer" and select "Removable Drive X" (X is the drive letter of your PSP)
4.Now if you are first time messing with FLASH_0, copy all Flash0´s folders and past them somewhere on your computer were you will not forget it( i suggest to copy folders to a folder FLASH 0)- that is how to back up your flash 0...That is if something goes wrong and if you want to replace your RCO theme with the original/normal theme.
5.Click and drag the contents of the theme into the corresponding folders in your PSP flash0. Ex. Copy the files inside of the "vsh" folder in the theme into the "vsh" folder in your PSP flash0. Do this for all of the folders in any theme.
6.Exit the recovery menu and check if it worked.All done!
-------------------------------------------------------------------
-------------------------------------------------------------------
HOW TO MAKE PTF THEMES
Download Custom Theme Converter v1.0
1.The first tab is the ?Information? Tab.
-Put the name of your Theme or its description in the ?Title? space.
-The ?Product ID? is where you assign what the Theme is associated to, e.g. Game, Anime, Movie, etc.
-The ?Version? is helpful if you want to do keep track of multiple versions of a Theme, but isn?t necessary either.
2.The second tab is the ?Wallpaper? Tab.
- Wallpapers have to be:
* 480 x 272 pixels
* 24-bit Color Image
* BMP files
- Click on the ?Folder? button to browse and select any image that matches the required size and format.
- If the image you select is not useable, an ?Error? window will pop-up letting you know what needs to change.
- You can click the ?Preview? button to preview your wallpaper once you?ve selected one that is workable.
3.Next tab is called ?Category Icons?, and is for the main XMB Icons.
- These icons need to be:
* either 64 x 48 pixels
* 8-bit Index (32-bit Color)
* TGA, PNG, or GIM image files
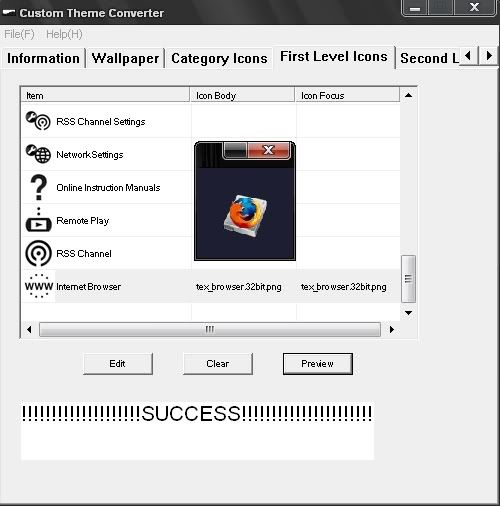
4.The ?First Level Icons? Tab is for the icons that appear within a category on the XMB.
- These are the sub-icons that appear below the category XMB icons.
- Double click on the icon line or click the ?Edit? button.
- You?ll see a request for two files: the ?Icon Body? and the ?Icon Focus?. The ?Body? is the actual icon.
- The ?Focus? is the glow that pulses around the icon when you highlight that icon. If you?d like to keep things simple, or not worry about having a pulsing glow around your selection, you can either use the default focus image or leave that space blank.
- The icons need to be:
* 32 x 32 pixels (Body)
* 48 x 48 pixels (Focus)
* 8-bit Index (32-bit Color)
* TGA, PNG, or GIM image files
5.The ?Second Level Icons? tab is for the ?Settings? Icon. That?s right; the ?Settings? wrench gets its very own tab!
- Just like the First Level Icons, these need to be:
* 32 x 32 pixels
* 8-bit Index (32-bit Color)
* TGA, PNG, or GIM image files
- Its focus needs to be:
* 48 x 48 pixels
* 8-bit Index (32-bit Color)
* TGA, PNG, or GIM image files
6.The last tab is ?Others?.
- The ?Preview Icon? is the tiny thumbnail that appears when you choose your Theme, and needs to be:
* 16 x 16 pixels
* 8-bit Index (32-bit Color)
* TGA, PNG, or GIM image files
- The ?Preview Image? is the preview for the Theme, and needs to be:
* 300 x 170
* 24-bit Color Image
* BMP
- The final option is ?Theme Color?. Here, you can assign a particular highlight colour to your Theme, or have it change monthly automatically.
7.Once you?ve assigned all of the Icons to your images, go to ?FILE? and select ?EXPORT?.
- Name your file, click ?SAVE?, and the program will create your PSP Theme File (.PTF).
- With your PSP connected to your computer in USB Mode or with a compatible Memory Stick connected, place the file into the proper ?Theme? folder ( \PSP\THEME ).
- Then Under ?Settings?, select ?Theme Settings?, and then ?Theme?.
EDIT:to edit those icons use paint(go to Start>Programs>Accessories>Paint)...
That´s all on how to make your own PTF Theme...
-------------------------------------------------------------------
-------------------------------------------------------------------
HOW TO MAKE CTF THEMES
What do you need?
1.DownloadCustom Theme Convert v1.0
2.Download Suporting prx´s
3.Download CTF Manager v1.0
4.Ptf wallpaper file in 480x272, 24Bit true color, BMP format (don't really need it if you don't want a wallpaper in your theme).
5.Ptf icon file in 16x16, 256 colors, PNG format (Preview Icon).
6.Ptf preview file in 300x170, 24Bit true color, BMP format(Preview Wallpaper).
Open up Custom theme convert
1.In Information tab fill:
-Put the name of your Theme or its description in the ?Title? space.
-The ?Product ID? is where you assign what the Theme is associated to, e.g. Game, Anime, Movie, etc.
-The ?Version? is helpful if you want to do keep track of multiple versions of a Theme, but isn?t necessary either
2.In Wallpaper tab, fill in your prepared wallpaper bmp. 3.In last tab, others, fill in your prepared png icon and bmp preview.
4.In File menu, select "Export", give it a name as you want. remember this name. (eg. (NAME).ptf)
5.After exporting, copy the new ptf to your desktop.
Open up Ctf Manager
6. Load the supporting prx's at File>INSTALL PRX IN SUPPORT FOLDER.
7. Then go to File> Create a ctf file.
8. Browse the vsh/font/ptf into the corresponding places of where it asks and add a name to it (make sure it is checked 3.90 for 3.90 m33 themes).
9.Click on CREATE CTF and it should do the job.
Then just put the ctf in PSP>THEME and your done!
--------------------------------------------------------------------
--------------------------------------------------------------------
CONVERT RCO THEMES TO PTF FORMAT
NOTE:***This is not my tutorial, so don´t ask me if something goes wrong***
First let me start off with the programs you will need
RCO EDIT
IfranView
MS Photo Editor (not needed if u don't want transparency)
Sony Theme Maker
Download programs
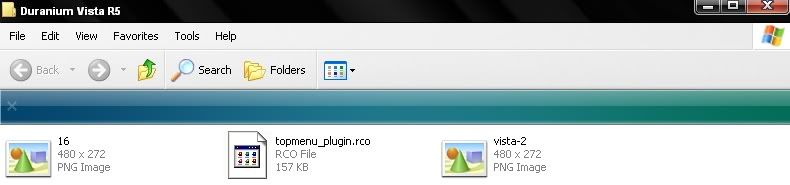
Ok now lets Begin First Download an RCO FILE for this Thread Im going to use a Theme called '"Duranium Nemesis "
you download the RCO File and then look for a file named "topmenu_plugin.rco"
Use RCO Edit and Open The RCO File
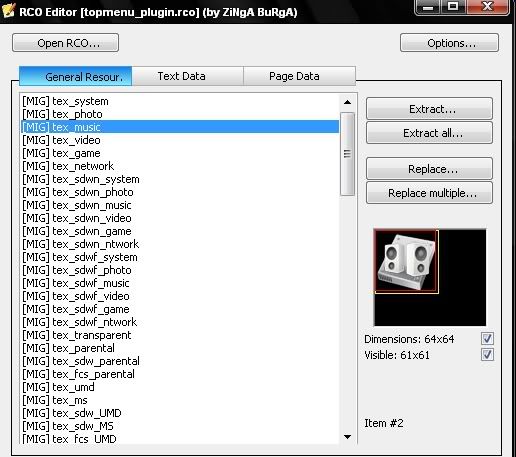
Now Hit Extract All
Note* Make a Folder and Extract the Files to a Folder So U can keep Theme Organized
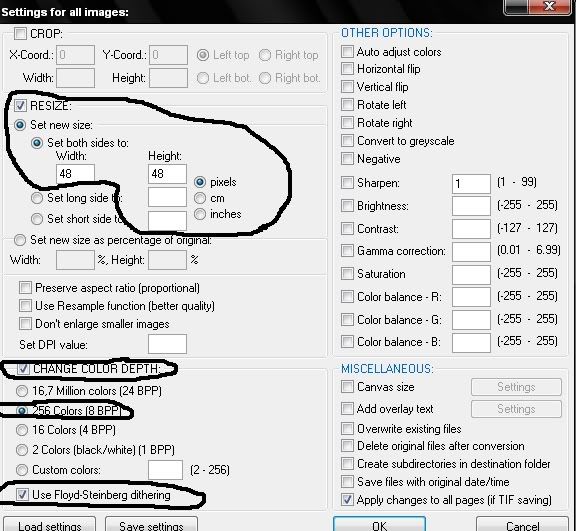
Once you've got all those Files Open InfranView and hit File<Batch Conversion/Rename
Now Use The Format PNG and hit Use Advance Options ; then hit
Set Advance Options and Use These Settings
Now Drag All The Files That came from RCO EDIT and put them In InfranView
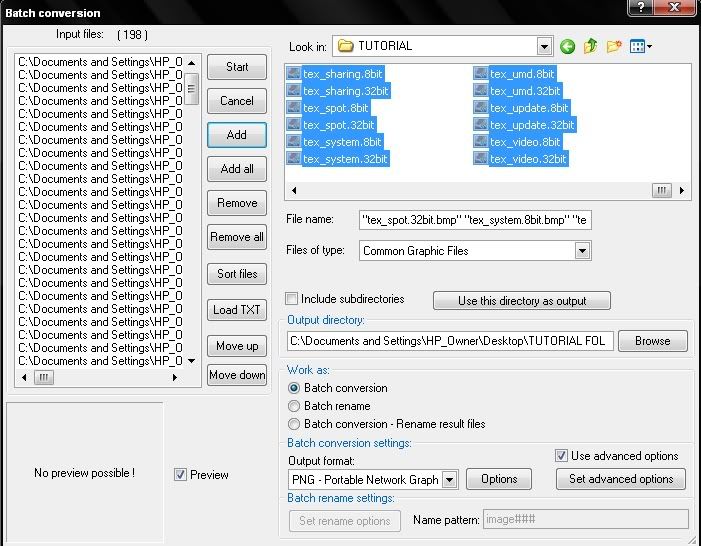
Then Hit Start
Now Guys your done if you dont want Transparent Icons but if you do Scroll down and Follow The Steps
Now is the Time you Open Microsoft Photo Editor then hit File<Open<"Open the file you want to be Transparent"
Then Hit The Pen like Icon n the top left and use it to hit the Black Box (or white) around the Icon
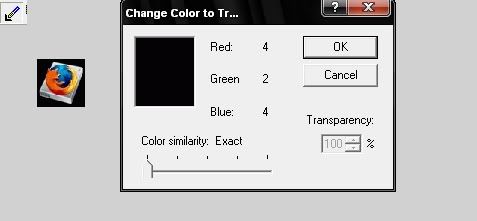
Congrats Dude now you have made your Icon Transparent Now open the PSP Theme Maker to Check if the Icon is now Transparent
Now you see the Icon is Transparent now do this to all the other Icons that you want and you will Be Successfu in Converting an RCO File to make a PSP Theme
Congrats
Also Remember These Rules for The Sony Theme Maker
Wallpaper
Wallpaper: 480x272 24-bit *.bmp
Category Icons
Icon Body: 64X48 256 colors *.png
First Level Icons
Icon Body: 48x48 256 colors *.png
Icon Focus: 64x64 256 colors *.png
Second Level Icons
Icon Body: 32x32 256 colors *.png
Icon Focus: 48x48 256 colors *.png
Others
Preview Icon: 16x16 256 colors *.png
Preview Image: 300x170 24-bit *.bmp
Icon Body: what the icon looks like when you are not selecting it.
Icon Focus: This image will appear behind the Icon Body and fade in and out when selected,
Do not use pure white (255 255 255) or pure black (0 0 0) colors in any of your images. Theme Converter may freeze if you do.
--------------------------------------------------------------------
--------------------------------------------------------------------
HOW TO MAKE XMB WAVES
How to create textures for XMB waves
With this tutorial you will learn how to create your own textures that will help you later on to create your XMB wave. The first thing is that you must have some knowledge of how to use a program like photoshop( ?or some other program that will let you edit .tga and .psd?).
Things you need are:
- Templates.psd
Download HERE
- Image editor that will work with .tga and .psd like photoshop Download Photoshop HERE
- TGA Wave Creator. To create waves from our new texture.
Download it HERE or THIS;your choice
SIZE and FORMAT of the Texture:
The first thing you got to know is that the textures for the waves are made from an image with a black background whose size is 128x128. Whatever you do in this image will be represented in your PSP a good as the PSP can, like waves. Eventhogh the image is 128x128, we have to imagine an inside frame in this image of 11x14 pixels, what im saying is that you can paint whatever you want inside that image, but never to close to the borders of 11 with and 14 length .Don?t worry ?Templates.psd? has an example of that frame
The colors of the textures have to be indexed, and they should not go over 256 colors. It will be saved as ?.tga? and its size should be exactly of 16,7Kb(17,196 Bytes).
Number of Waves:
The second thing that you got to know is the number of waves that you can do. In the beginning you will think that the PSP is only capable to reproduce 2 or4 waves. Let me give you an easy example. If we draw one line, the PSP will reproduce 2 waves that will move independently from one another. If I draw 4 parallel lines the PSP will reproduce 8, but it will always act like two, what im saying, 4 waves will move at the same time and the other 4 will move different to th first 4.
The lines that you draw must be horizontal ?____? if you put them vertical ?│? you will get some weird things.
Creating our first texture:
The first thing that you start with is by creating an image ?waves.bmp? with MS Paint. Make it simple. Just as an example I did two lines one of each color Blue and White
Remember make it 128x128
According to what I said before about, the result of this drawing will be 4 waves (2blue 2 white).
Once you have this, save it as ?waves.bmp? simple and easy to remember. Put it on you desktop or a place where you have easy access. Now open Photoshop or a similar program. Now open the ?wave.bmp? file that you just created. Also open the file ?Templates.psd? look at the layers in this file. pay close attention.

Note* If you can?t see the layers press F7.
Here we can see that ?Template.psd? has different layers. We will concentrate in the one named ?Drawing? This will be the layer in which we will work on.
If you look closely in the window with the complete image (not the layer one), the lines don?t reach all the way to the border. A black frame has appeared (You remember, right?) It should look something like this.

Now you go to ?file?=>?Save as..? in the file name put something like ?wave? and on the type of file choose ?Targa(*.tga;*.vda;*.icb;*.vst). Finally click ?SAVE? Now another window should pop out with the options of resolution, choose ?24bits/pixels? and click OK.
There, you now have you texture pretty much finished. Now you need to make it the right size and color. For that open your file ?wave.tga? with Photoshop. Go to ?Image?=> ?Mode? now go to ?Indexed color??. Now go to the Palette tab down to
?Local (selective)? and click ok
Now you just have to save this new image, go to ?File? Save as? for the type of file choose .tga again for the name is important to put a different name like ?wave2.tga?
It?s a new file
Now we are done, close photoshop and make sure that the file is 16,7Kb. If everything is right,you have the texture ready for the new XMB wave.
TGA Wave Creator
Now place the file ?wave2.tga? inside the ?TGAwave folder? Run ?start.bat? and follow the instructions. Type the full name like so ?wave2.tga?
And when it asks you to pad the RCO the right size type ?Y? for Yes.
It takes about ten seconds and your system_plugin_bg.rco should be ready. Now just copy it to your resource folder in flash0.
--------------------------------------------------------------------
--------------------------------------------------------------------
HOW TO INSTALL GAMEBOOTS
1.Download your gameboot...example EA Sports
2.Go into the Recovery Menu by holding R at startup
3.Go into 'Advanced Settings' and go on 'Toggle Flash0'
4.A pop-up may come and press view files on the computer. Then if they are less than 6 files in the root of Flash0 you will have to unhide some.
5.To unhide, download Quick Tuning Flasher V2, and copy the the contents of 'Flash0Root' to the root of Flash0. Then run 'ejecutar.bat', on the computer and hopefully 6 folders should show up.
6.Then make a folder on the computer named anything. Eg. 'Flash0 Backup'. Copy and paste the folders in Flash0 to the folder you just made, incase you want the normal XMB back or something goes wrong.
7.Make a backup; by copy and pasting all the folders into a folder on your computer named anything. Eg. 'Flash0 Backup'.
8.Then go into VSH, and then into 'Resource' and copy and paste your gameboot named 'gameboot.pmf' and let it overwrite the official Sony one.
You are done!
--------------------------------------------------------------------
--------------------------------------------------------------------
HOW TO DEBRAND YOUR GAMEBOOT
EDIT:What is debranding?
When you first flash a gameboot(on a CFW PSP that uses original PSP Theme, no CTF or Flash0 theme), you always see the PSP logo on top of your new gameboot.
OK so lets begin...
Download Gameboot Logo Remover
Extract the following files to a map of your choice:
Logo remover.exe
blanklogo.bin
Now, set your PSP USB to Flash0.
Connect the PSP to the PSP.
Open up: My Computer-PSP USB letter(example: E:/)
Go to the map VSH
Go to the map Resource
In the map Resource, find the file: opening_plugin.rco.
Copy it to the map where you extracted Gameboot Logo Remover.
Now open Logo remover.exe, you can find it in the map where you extracted Gameboot Logo Remover.
Select the map where you stored the opening_plugin.
Hit the open button
Your gameboot is unbranded. Copy the new opening_plugin to your flash0(F0-->VSH-->resource)
NOTE: Make a backup of the old one, then delete the old one from your flash0
--------------------------------------------------------------------
--------------------------------------------------------------------
HOW TO CHANGE HOMBREW ICON
This is basically how to change:
this:

To this:

First off, I'm doing this from a firmware version 1.50 perspective (two folders)
If you have 1.00 or 2.00+ then the same basic principles apply, there will just be a few extra files inside the eboot.
To start out, you will need three things:
1.Installed homebrew
2.PBP Unpacker
3.An icon and/or a menu background that you want to replace with the original one(s).
---If you dont know what I'm talking about, look at the picture below:

A good place to get these is HERE
note: If you download your images and they are in a format other than .PNG (like .JPG or .BMP) then you need to convert them
Once you have all that...we'll start.
For this tutorial, we will be focusing on the EBOOT.PBP files within the folder with the "%" sign:

1. Open up the folder with the % sign as shown above (green box) and open that EBOOT.PBP file using PBP Unpacker
2. Right click on the file PARAM.SFO and say "extract"
----You can extract this file to anywhere that you will remember...its only going to be there temporarily...I suggest the desktop of your computer.
--------------------------------------------------------------------
--------------------------------------------------------------------
OK there it is my fist guide...I hope you guys like it
This message has been edited since posting. Last time this message was edited on 28. July 2008 @ 10:04
|
|
Advertisement
|
 |
|
|
Senior Member
|
27. July 2008 @ 22:07 |
Link to this message

|
|
Id recommend addding warnings to the Flash0 part as Im sure that a lot of people using more recent CFW have a lot of bricks installing themes this way
|
Member
|
28. July 2008 @ 07:29 |
Link to this message

|
|
So nobody likes it =( ...
|
Senior Member
|
28. July 2008 @ 07:41 |
Link to this message
|
wow and i thought the one i made ages ago was big
good first guide
when you do about installing roc themes make sure you just add a bit about backing the flash0 up as it makes sure that noobs still have the original files to go back on
DERP DERP
|
Senior Member
|
28. July 2008 @ 07:45 |
Link to this message
|
Originally posted by taddy1449:
So nobody likes it =( ...
Its a great guide, like the pics, just recommend adding security warnigns to make it perfect :)
|
Member
|
28. July 2008 @ 07:46 |
Link to this message
|
Originally posted by Dr1ver:
wow and i thought the one i made ages ago was big
good first guide
when you do about installing roc themes make sure you just add a bit about backing the flash0 up as it makes sure that noobs still have the original files to go back on
That is in 4. step...Is that not enough?
|
Senior Member
|
28. July 2008 @ 07:51 |
Link to this message
|
Originally posted by taddy1449:
Originally posted by Dr1ver:
wow and i thought the one i made ages ago was big
good first guide
when you do about installing roc themes make sure you just add a bit about backing the flash0 up as it makes sure that noobs still have the original files to go back on
That is in 4. step...Is that not enough?
Sorry, only skimmed through the guide :-P
Great Guide :D
|
Senior Member
|
28. July 2008 @ 09:50 |
Link to this message
|
Originally posted by taddy1449:
Originally posted by Dr1ver:
wow and i thought the one i made ages ago was big
good first guide
when you do about installing roc themes make sure you just add a bit about backing the flash0 up as it makes sure that noobs still have the original files to go back on
That is in 4. step...Is that not enough?
o right sorry i didnt quite see it i did the same as chwoolgar and just skimmed through it a bit
but just to point out that should be first and make it stand out a bit more. only reason i say this is that some people will do the same as me and skim it but not knowing what they are doing (thinking there following the guide right)
just a suggestion thats all apart from that i couldnt have done better myself
DERP DERP
|
Member
|
28. July 2008 @ 09:58 |
Link to this message
|
|
Ok i will replace 4. step to 1...:=)
|
|
Advertisement
|
|
|
Senior Member
|
28. July 2008 @ 10:19 |
Link to this message
|
this was the guide i made ages ago -> http://forums.afterdawn.com/thread_view.cfm/662808
feel free to use anything in it in your own guide as the one i made i old now
it does have a couple of tips on reducing space on the flash0 which you should find is a common problem with the fat psp's
DERP DERP
|
|


